


I've recently been getting into sewing more Activewear. It's something that has happened organically in my career. Perhaps it's because I'm a runner or the boom in athleisure wear. I've found as I'm sewing more active apparel there isn't much information on the topic. So I wanted to start creating more content on sewing Activewear for those interested in it like myself. As I've been learning, it's not the easiest to create at times. When fit, support, and comfort all play a role, but also fabric like spandex can be tricky to sew with. It's also essential to use the right supplies from Dritz and techniques to produce quality Activewear. So let's start with a basic sports bra, which is a wardrobe essential. Get the full tutorial below and make your own.
For the cycling shorts which can work as a Capri or make the hem shorter for a spandex short go here.

Supplies:
- Dritz 1" Braided Elastic
- Dritz 1" Fold-Over Elastic
- Rotary Cutter
- Cutting Mat
- Pattern Weights
- Matte Tricot Knit: 1 yard
- Power Mesh: 1/2 yard
- Pattern or garment to draft
- Brother 1034DX Serger
- Brother Sewing Machine
- Ball point needle (twin needle optional)
Fabric:
It's important to use the right materials for Activewear. I typically look for a nylon/spandex blend with 4-way stretch. You will want to use high quality fabric with stretch and coverage. Stylish Fabric has a great selection of fabrics made for this. I went with their Matte Tricot Knit that comes in a several colors and Power Mesh for the back. Both have high compression quality and durability. You can't go wrong with any of the selections here.
Pattern:
Pattern:

I drafted a standard sports bra silhouette with a curved neckline and racerback from one of my sports bras.
- Use a garment to draft your pattern that fits you how you'd like.
- You can use a pattern as well.
- Lay the garment flat on top of pattern paper and use pattern weights if necessary.
- Trace right along the garment edge onto the paper.
- Add a seam & hem allowance border. I usually do a 1/4" for athletic wear but because I'm using Fold-Over Elastic along the arm openings and collar, I only added the seam allowance.
- Make sure to add an additional 1" to 1.5" (or more if necessary) for the elastic waistband at the bottom hem. Keep in mind the width of the elastic you intend to use. Mine was 1" so I added an additional 1 1/4" for the elastic casing and the allowance.
- Add your necessary pattern markings (fold, front, back etc.).
- Repeat for the back.
Tip: If you plan to use FOE make sure to add that into the pattern. For example you may want to remove 1/4"-1/2" from the pattern edge to account for it.
Pattern Layout/Cutting:


When working with stretchy/slippery fabrics like spandex (or any knit for that matter), I use Dritz pattern weights, a rotary cutter, and mat to cut the pattern out. It's much easier this way, saves time, and great for accuracy on stretchy materials.
For a sports bra I typically cut a liner for the front as well. The back I used a power mesh which is ideal for proper ventilation (I live in Georgia).
I am using my Brother 1034DX Serger and my Brother SE625 Sewing and Embroidery Machine. It's ideal to have a serger but not necessary. A sewing machine will do just fine.
You will want to use a ball point needle when sewing with spandex/knit fabrics or you may get skipped stitches. I also use a zigzag stitch (2.5, 2.0).
Professional tip: use a twin needle to finish the hems. It has the finish similar of a Cover Stitch Machine and a professional result.
Construction:

Place front and liner front wrong sides together. Pin and sew (1/16th from the raw edge) the neckline, the arm openings, and the bottom with a zigzag stitch or serge.


Place front and back right sides together and sew the shoulder seams.
Fold-Over Elastic (FOE)
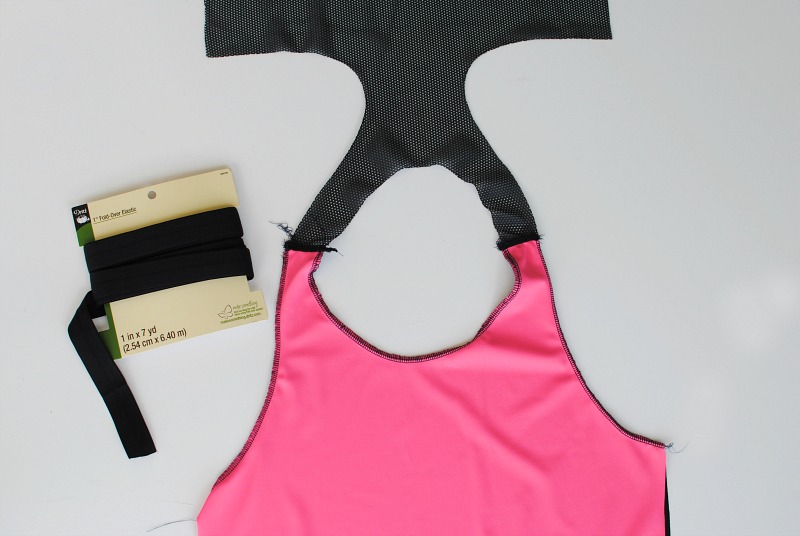
To give the bra more support and an overall nice finish I used Fold-Over Elastic (FOE) as binding around the sides and neckline. Dritz offers all kinds of colors, prints, and sizes (here). I'm using the 1" for this one.

For the arm openings I'm sewing them in the flat since I haven't sewn the side seams yet.
Measure the arm opening and cut your elastic 1" smaller. The general rule is the FOE should be shorter than the opening. I usually do my elastic on curved edges about 80% smaller than the garment measurement. On straight edges I may do 95% or none at all if there is already negative ease.

You will need to evenly distribute the elastic. Measure and mark off the quarters on the arm opening and the elastic. Pin the FOE encasing the raw edge matching the quarter marks together. You will need to stretch the elastic to match with the garment marks since the elastic should be slightly smaller.

Sew the FOE along the arm opening...I like to use a slight zigzag (2.5/2.0) and sew as close to the edges of the FOE as possible making sure to sew through the front and back.
Tip: When sewing elastic on edges, pull the elastic with minimal tension on straight edges and about 60-70% on curved edges.


For the neckline I'm sewing in the round because the shoulder seams are already sewn. You will measure the opening, subtract a 1/2" inch and cut the FOE to this measurement.
Before attaching to the neckline you will need to sew the FOE together to create a loop. Place right sides together and sewed with a zigzag stitch (1/4" seam allowance). Press seam allowance flat.*Align the FOE seam with the center back.
You will need to evenly distribute the elastic. Measure and mark off the quarters on the arm opening and the elastic. Pin the FOE encasing the raw edge matching the quarter marks together. You will need to stretch the elastic to match with the garment marks since the elastic should be slightly smaller.

Sew the FOE around the neckline (zigzag 2.5/2.0).

The finished result of the FOE edges.

Sew the side seams right sides together.
Bottom Hem Elastic:

For the bottom hem I'm using Dritz Braided Elastic 1". I prefer this fold over technique rather than creating a casing. You can even use the FOE here has well.
Measure the bottom opening and cut the elastic to equal this measurement. Because this is a straight edge and the sports bra should most likely already have negative ease, I don't need the elastic to be much tighter. I also will add a 1" overlap to sew the elastic into a loop.
Sew the elastic into a loop by overlapping ends (1/2 overlap) right sides together and sew a zigzag stitch.

Again, mark and match quarter points. Pin the elastic on the wrong side of the garment aligning raw edges.

Sew along the edges (1/16 SA) with the elastic on top. You may need to stretch the elastic to match with the garment marks since the elastic should be slightly smaller.

Then just fold up the elastic and top stitch into place along the top edge of the elastic.
You can use a twin needle or a zigzag stitch (2.5/2.0). I like using a twin needle for a professional finish.
Tip: to avoid rippling make sure to keep the fabric perpendicular and flat. If you pull the fabric in different directions you will get that along the hemline.


For the back I used a zigzag stitch.
Wear Test:


Now give it a good wear test! Every brand has to do wear testing before taking product to manufacturing. Take notes on fit/comfort/support for the next one. Overall this turned out great with some minor things I'd change.

Once you master one you will want to do more. This track racing kit (above) featuring a sports singlet (pattern edited from BurdaStyle: Crop Sports Bra #104 01/2017) and track buns I made for my former Teammate/friend who is a professional Track Runner.
It can be a bit of trial and error as I've learned but with the right products and techniques you can have a successful result (pun intended).
I will go to the gym next week, I will make it tonight. Thank for your sharing!
ReplyDelete- roll the ball -
This is my favorite. And thanks to this article I can do it myself , thank for sharing with us
ReplyDeleteaddicting games
Woww it looks so kool. I like it much gmail sign in
ReplyDeleteGuide to sew a sports bra is simple and beautiful, now I can sew yourself one such
ReplyDeleterun 3
This comment has been removed by the author.
ReplyDeleteI will make it with my Best embroidery machine
ReplyDeleteThis comment has been removed by the author.
ReplyDeleteSuperbly written article, if only all bloggers offered the same content as you, the internet would be a far better place.. Resultados fútbol mexico
ReplyDeleteWomen often like to learn about stitching so that they may sew their clothes for themselves. Most of the women earn some money for their children after sewing the clothes of the women. I appreciate your work. buy dissertation online
ReplyDeleteHigh quality fabrics with stretch and coverage are key when it comes to sewing activewear. The other key ingredients for a DIY sports bra are the Dritz elastics
ReplyDeletekahoot smasher apkxyz
Thanks for sharing nice information with us. i like your post and all you share with us is uptodate and quite informative, i would like to bookmark the page so i can come here again to read you, as you have done a wonderful job Source
ReplyDeleteSpot on with this write-up, I truly think this website needs much more consideration. I’ll probably be again to read much more, thanks for that info.
ReplyDeleteVisit Site
Devote.se
Aivivu - đại lý chuyên vé máy bay trong nước và quốc tế
ReplyDeletesăn vé máy bay giá rẻ đi Mỹ
lịch bay từ mỹ về việt nam
các đường bay từ canada về việt nam
có vé máy bay từ nhật về việt nam không
vé máy bay từ hàn quốc về việt nam
Vé máy bay từ Đài Loan về VN
chi phí vé máy bay cho chuyên gia nước ngoài
I would like to thank you for the efforts you have made in writing this article. I am hoping the same best work from you in the future as well. In fact your creative writing abilities has inspired me to start my own BlogEngine blog now. Really the blogging is spreading its wings rapidly. Your write up is a fine example of it. photographer in cape town
ReplyDeleteGreat post full of useful tips! My site is fairly new and I am also having a hard time getting my readers to leave comments. Analytics shows they are coming to the site but I have a feeling “nobody wants to be first”. rewards yesstyle
ReplyDelete